Medical bookings, letter of authorisation, and health plan eligibility
5
min read

Guide benefits
This guide demonstrates how to use Proto’s platform to automate medical appointment scheduling, letters of authorization (LOA) requests, and payment verification. These transaction-heavy interactions often burden frontline staff and introduce delays for patients or employees. Deploying an AI agent streamlines these transactions, reduces administrative workload, and ensures accurate, real-time communication with users.
Who can benefit from this guide:
- Clinics and hospital networks
- Insurance providers offering healthcare coverage
- Health Maintenance Organisations (HMOs)
- IT teams responsible for digital health channels
- Operations or CX managers digitising patient support
Medical appointment scheduling
This workflow enables patients to independently book consultations, diagnostic procedures, and follow-up visits through a 24/7 conversational assistant available on web or messaging platforms. It reduces scheduling friction, lowers missed appointments, and frees frontline staff from handling repetitive inquiries—delivering a more seamless and accessible patient experience. The guide outlines how providers can automate appointment booking while integrating with internal calendars, doctor directories, and patient management systems. See how to automate medical appointment scheduling.
Letter of Authority (LOA) requests
A Letter of Authorization (LOA) allows insured members to access healthcare services—such as consultations or diagnostics—at accredited facilities without upfront payment. The LOA serves as official confirmation that the service will be covered under the member’s plan. Traditionally managed via hotlines or on-site requests, the LOA process can now be digitized through an AI agent. Members provide basic verification, select the service and provider, and receive an LOA instantly, valid for a limited time and redeemable at clinics. This automation reduces administrative overhead and accelerates access to care. See how to automate LOA generation.
Health plan eligibility
Before receiving treatment, members often need to verify that their health plan is active and eligible for coverage. This step is critical for both patients and providers but is commonly delayed by manual processes and hotline queues. With an AI-powered workflow, members can verify their coverage in real time by submitting basic personal information or a policy number. The AI agent retrieves and displays eligibility details instantly, helping confirm plan status and supported services—improving transparency and reducing bottlenecks at the point of care. See how to automatically verify insurance plan coverage.
Medical bookings
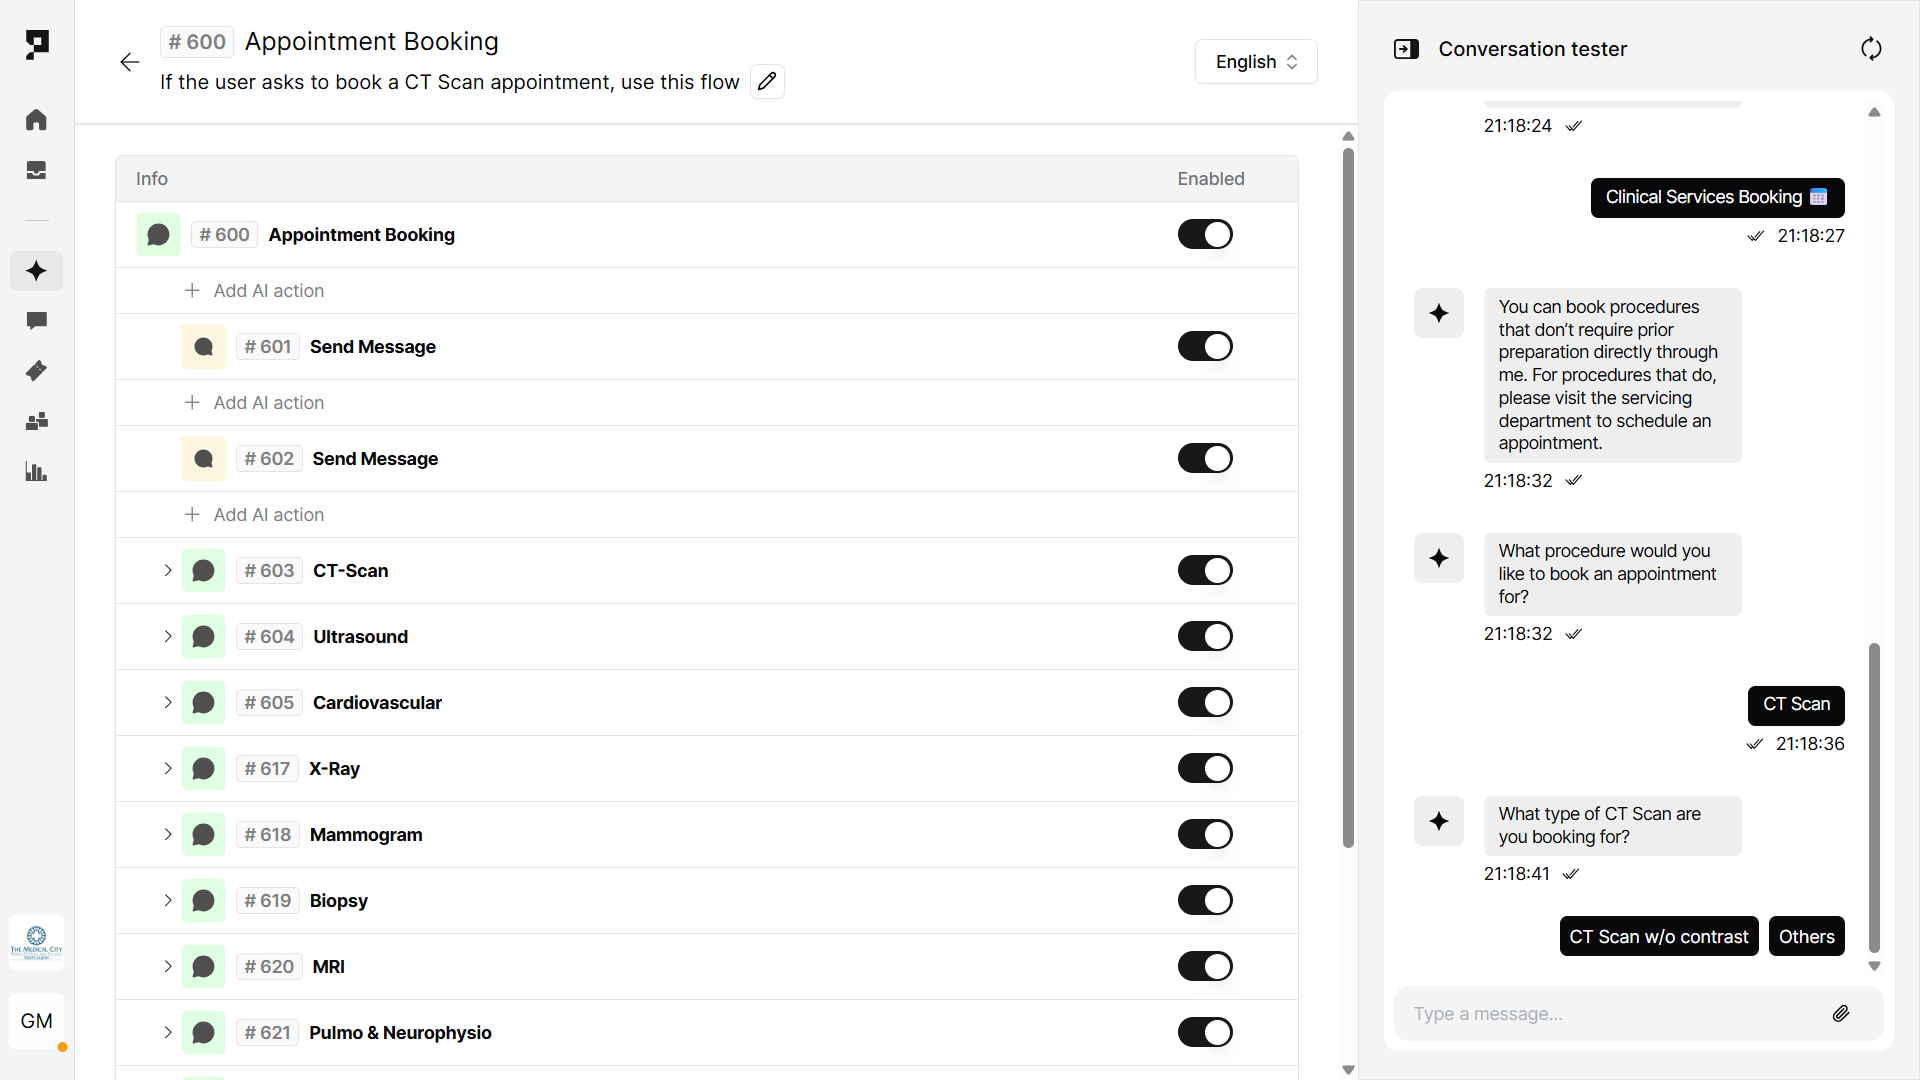
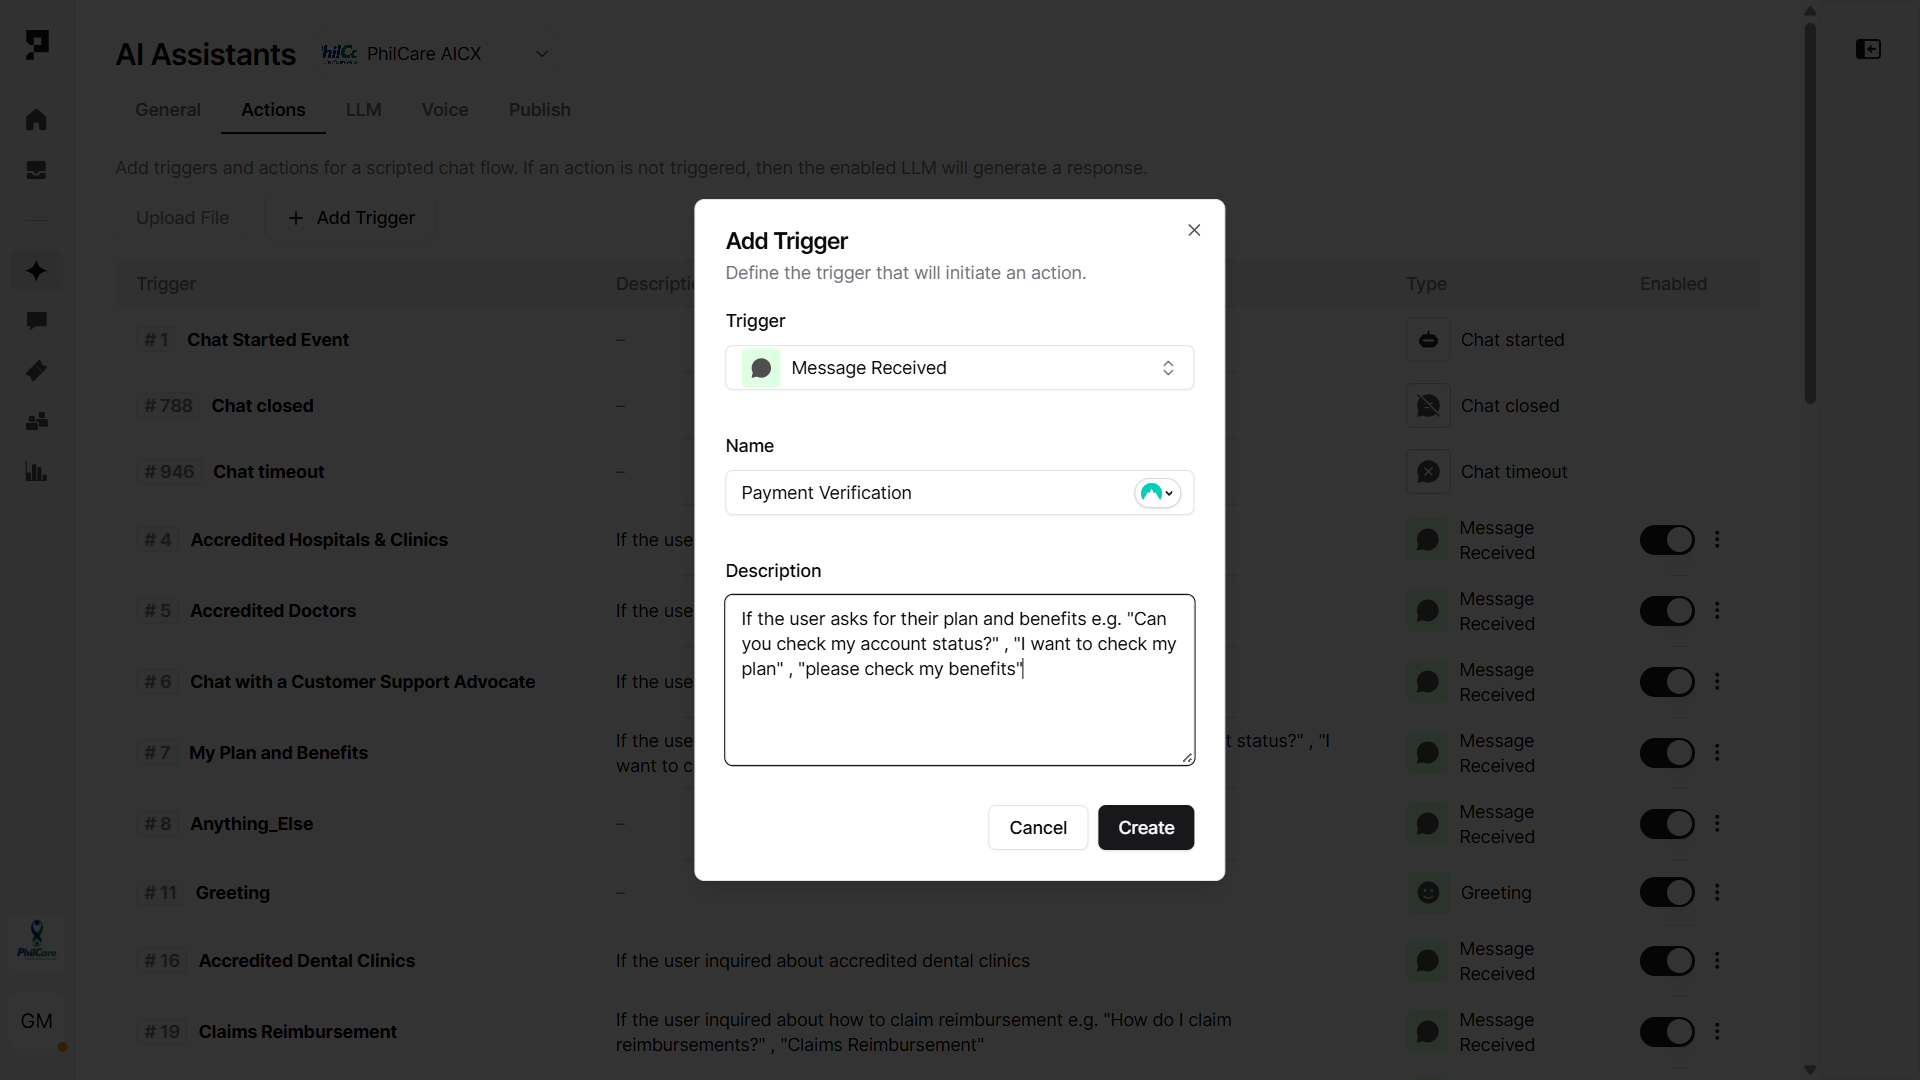
1. Create a Trigger
Purpose: Create a new flow within AI Assistant Actions.
- Navigate to the Actions tab in the AI agent settings.
- Click “+ Add Trigger” button and select the Message Received trigger type.
- Name the trigger (e.g. “Appointment Booking”) and provide a short description like “Triggers if user requests to book a CT Scan appointment.”
- If your AI agentis powered by an LLM, the Description acts like a prompt to help the AI decide when to activate the trigger.
Learn more about AI Triggers and Actions.

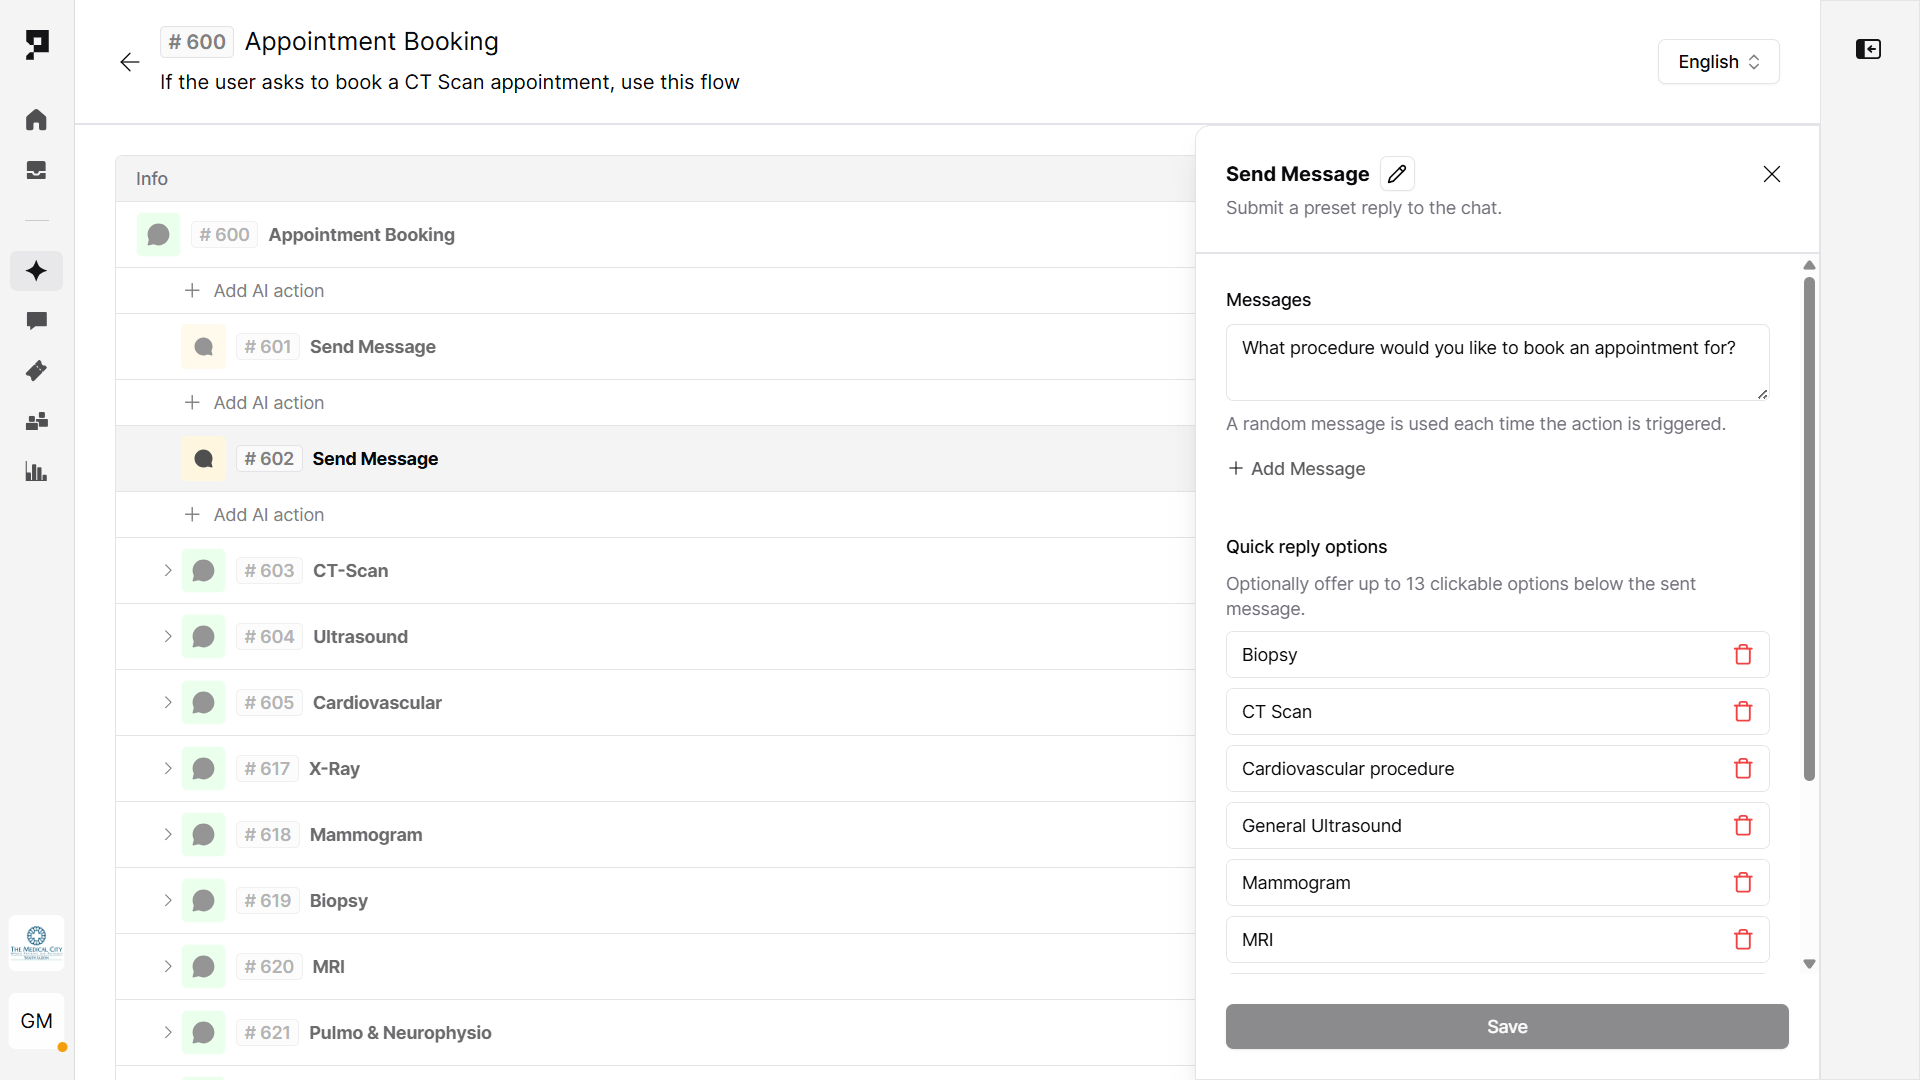
2. Add a Message Action with quick replies
Purpose: Ask the user what procedure they want to book.
- Use a Send Message action to prompt: “What procedure would you like to book an appointment for?”
- Add Quick Reply options, such as:
- CT Scan
- Biopsy
- Cardiovascular procedure
- Ultrasound
- Mammogram
- X-Ray, MRI, etc
- If you have a long list of procedures, consider organizing them into nested Actions by category (e.g. Imaging, Cardiology, Laboratory)
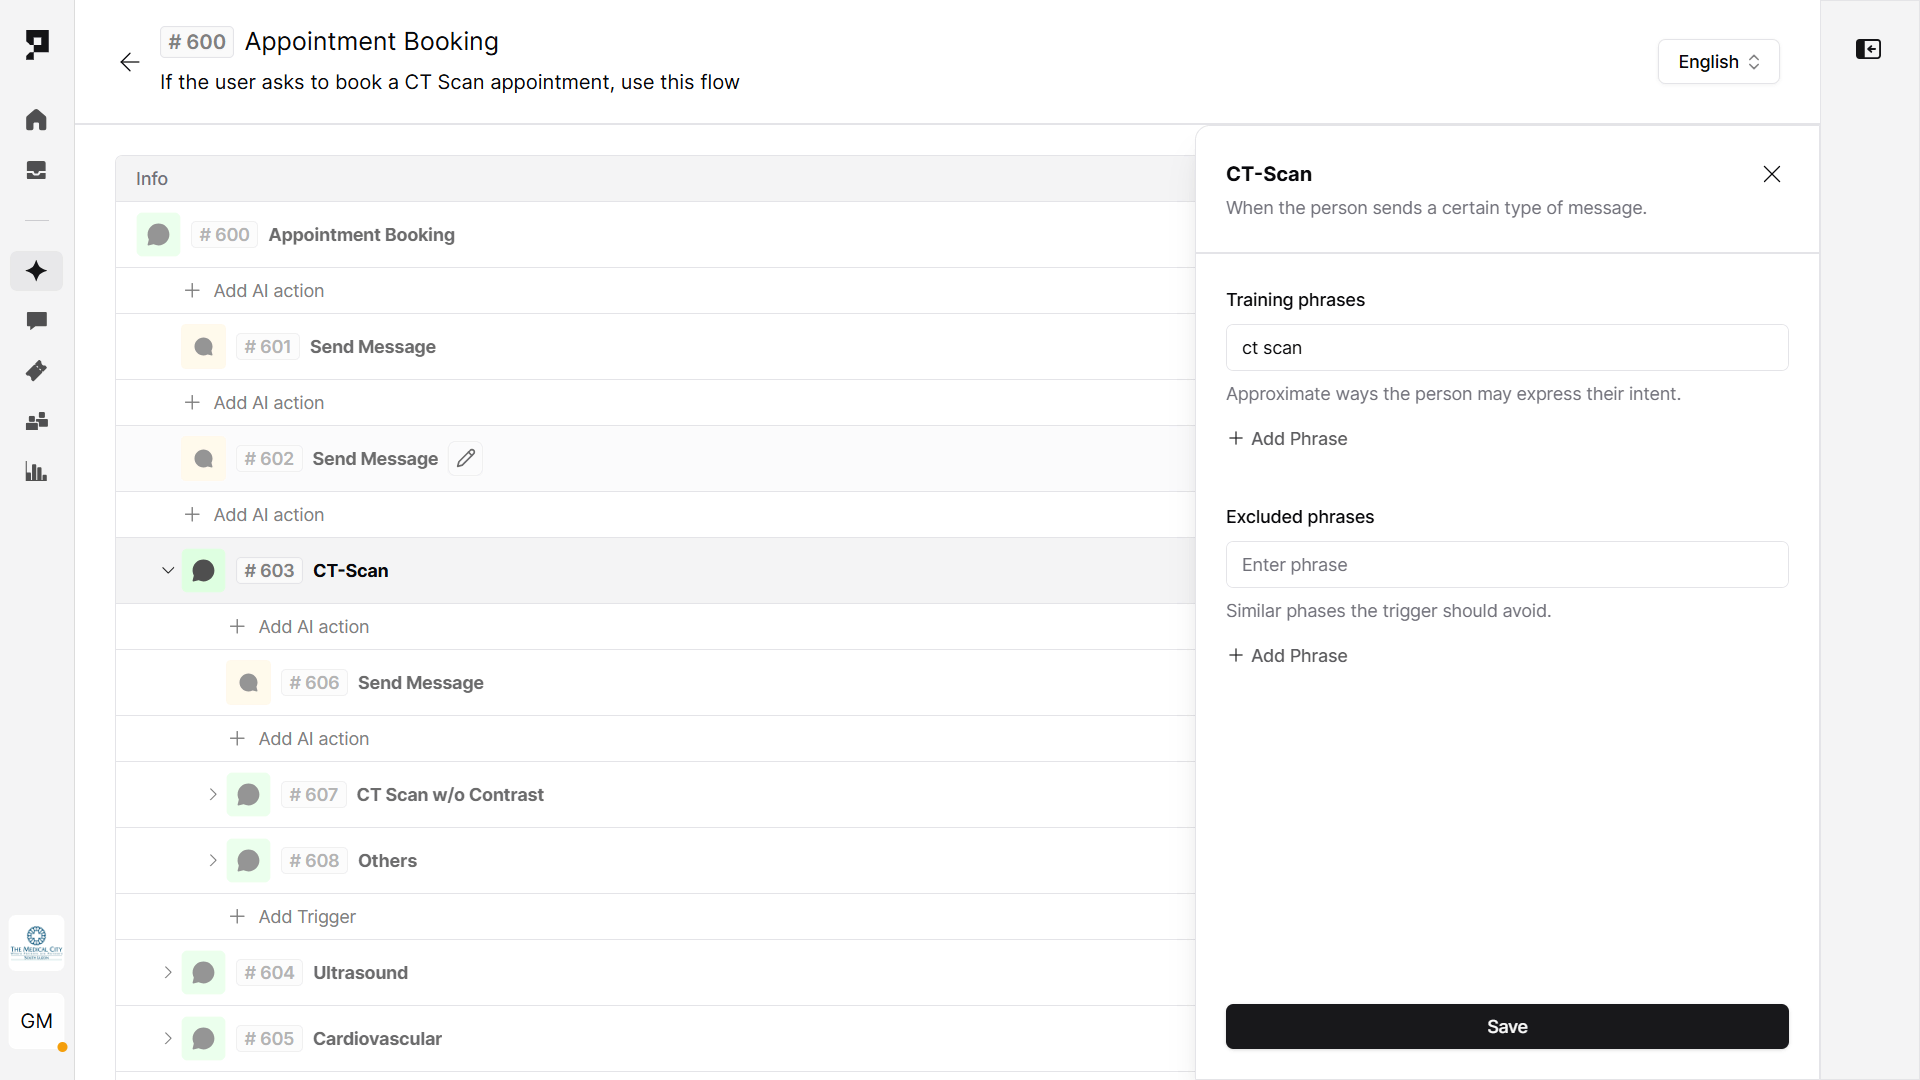
3. Create sub-triggers for each category
Purpose: Trigger the selected procedure booking.
- For each procedure category, create a sub-trigger (Trigger type: Message Received)
- For each sub-trigger, add relevant training phrases. Training phrases are used to define the patient's conversational intent. Once the patient's message matches training phrases, the Trigger will be executed. Example:
- Trigger Name: CT-Scan booking
- Training Phrase: ct scan
This ensures that when the user selects "CT Scan," the AI agent triggers the correct flow (in this case all Actions under the “CT-Scan booking” trigger).You can add deeper nested sub-triggers to further guide users step-by-step, and include options to return to the previous step or exit the flow entirely.
4. Capture patient's details for the booking
Purpose: Capture the patient's personal details and the preferred date for the booking.
Use a Survey Action to collect the required information, including the appointment date. Every values will be automatically stored in the related variable (e.g. appointment_date) allowing further manipulations with the collected data:
- First name (
first_name) - Last name (
last_name) - Email (
email) - Phone number (
mobile) - Preferred appointment date (
appointment_date) – format:mm/dd/yyyyor your preferred format

5.Check available time slots with API
Purpose: Use a backend scheduling API to validate slot availability.
- Use the Send API Request action. Method:
GET - Add URL endpoint, API key and define the variable to store the API response (e.g.
ct_schedule).

6. Confirm time slot availability
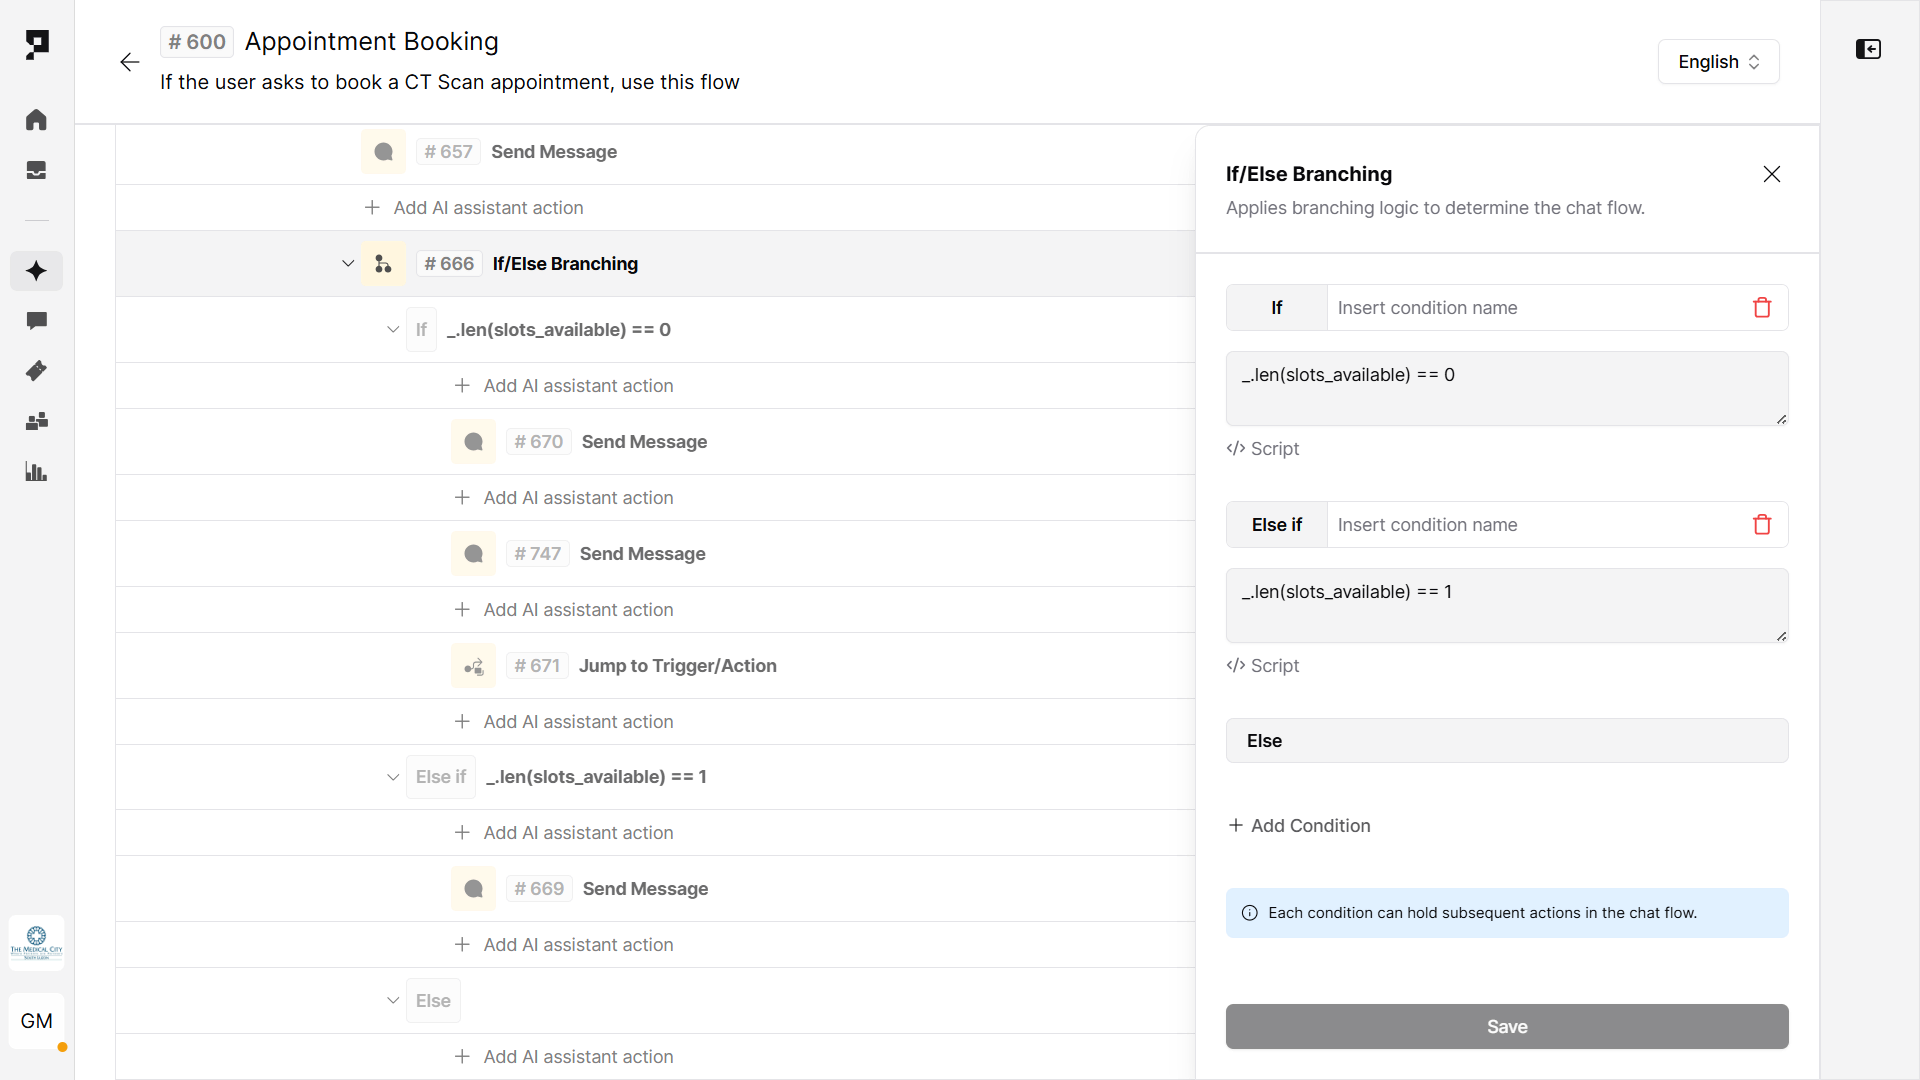
Purpose: Respond to the user with slot confirmation based on the API data.
Use an If/Else Branching action to evaluate the API response variable (slots_available).
In the example shown:
- Condition:
_.len(slots_available) == 0- Response: Inform the user that no slots are available.
- Optionally, suggest trying another date or return to the procedure selection.
- Condition:
_.len(slots_available) == 1- Response: Confirm the available time slot with the user and proceed to confirmation steps.
- Else: Handle other unexpected or undefined states in the schedule response.
This logic ensures the AI agent can dynamically adapt the flow based on availability results from the backend.
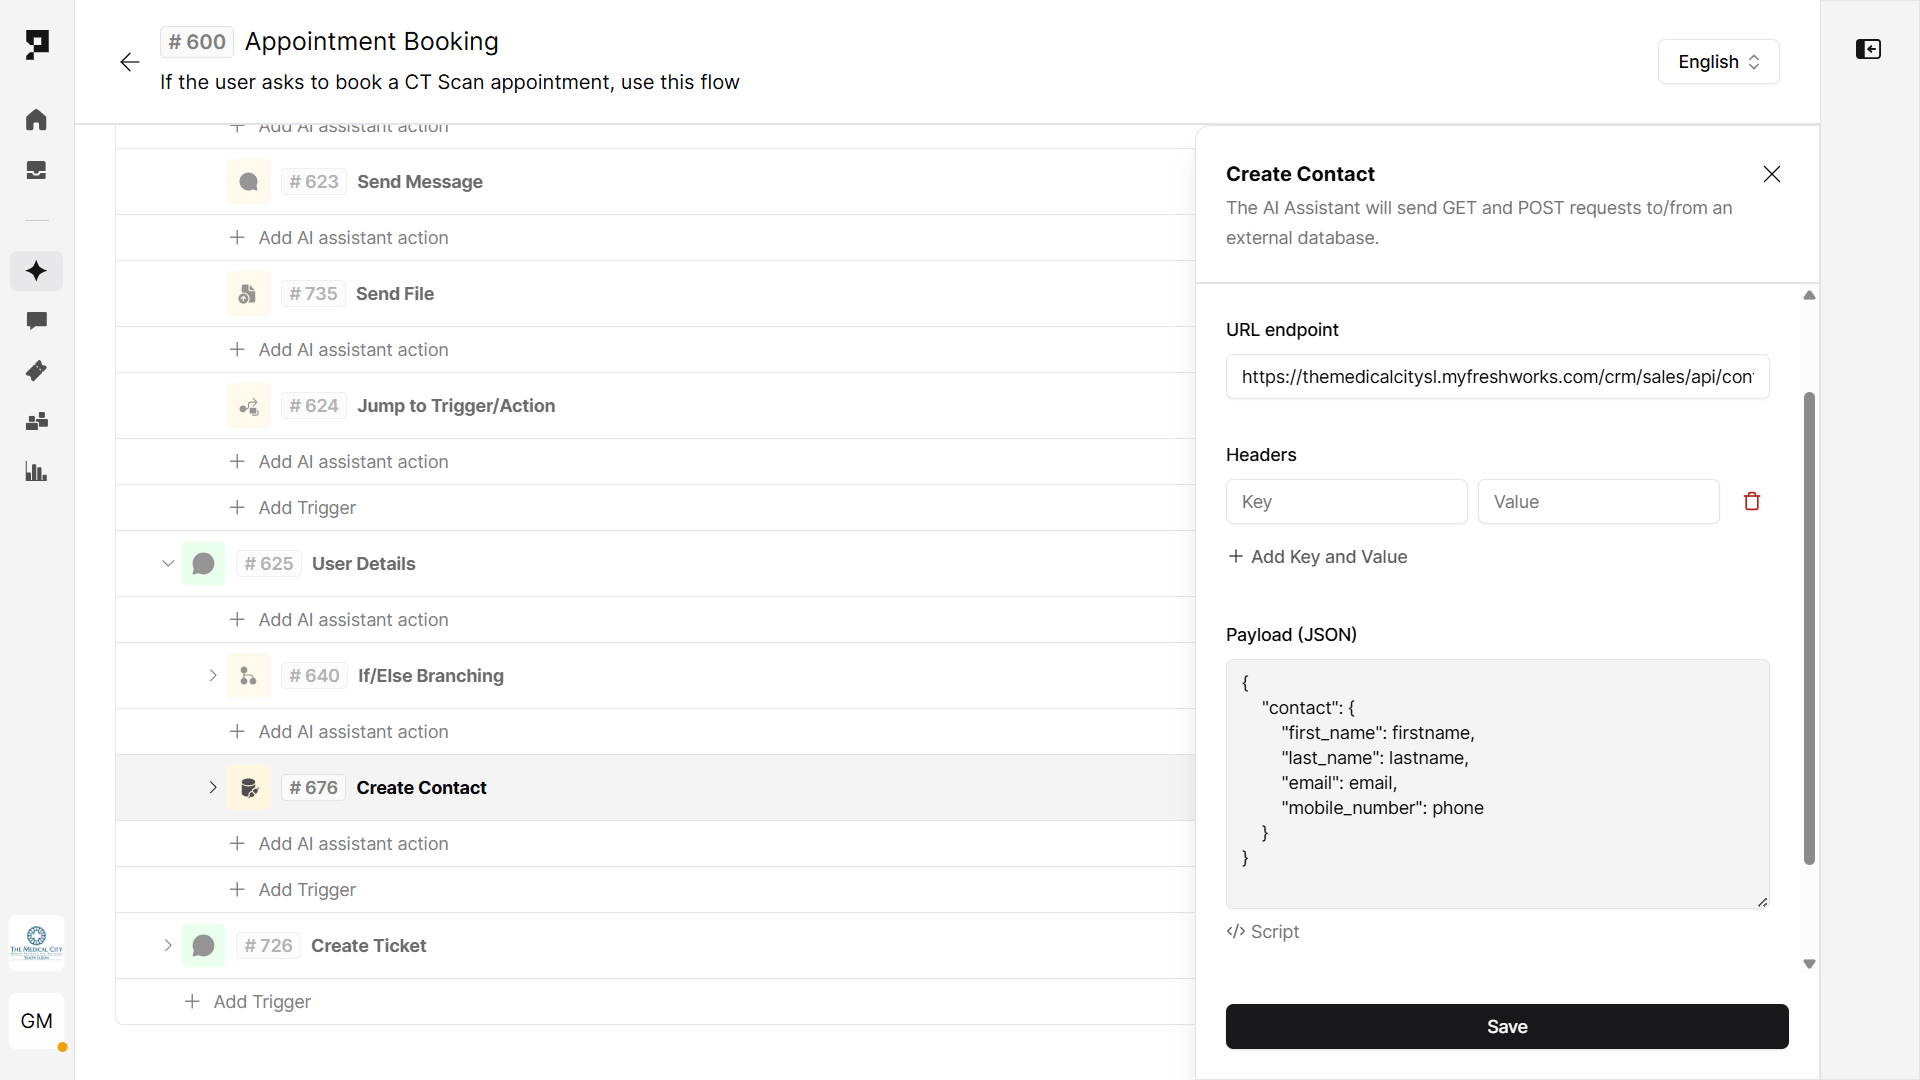
7. Confirm and create appointment
Purpose: Register the user in the system using collected contact details.
- Use the Send API Request action. Method:
POST - Add URL endpoint, API key and JSON payload with the patient's details captured earlier.
This step ensures that the user’s contact information is stored or synced with your backend system before confirming the appointment.
8. Test the flow
You can test your new workflow without leaving the Action settings, using the Conversation tester side panel. Finalize the AI agent deployment by configuring your preferred channels and languages.
Letter of authorisation
1. Create a Trigger
Purpose: Create a new flow within AI agent actions.
- Navigate to the Actions tab in the AI agent's settings.
- Click “+ Add Trigger” button and select the Message Received trigger type.
- Name the trigger (e.g. “LOA Request”) and provide a short description like “Triggers if user requests a Letter of Authority for consultation.”
- If your AI agent is powered by an LLM, the Description acts like a prompt to help the AI decide when to activate the trigger.
Learn more about AI Triggers and Actions.

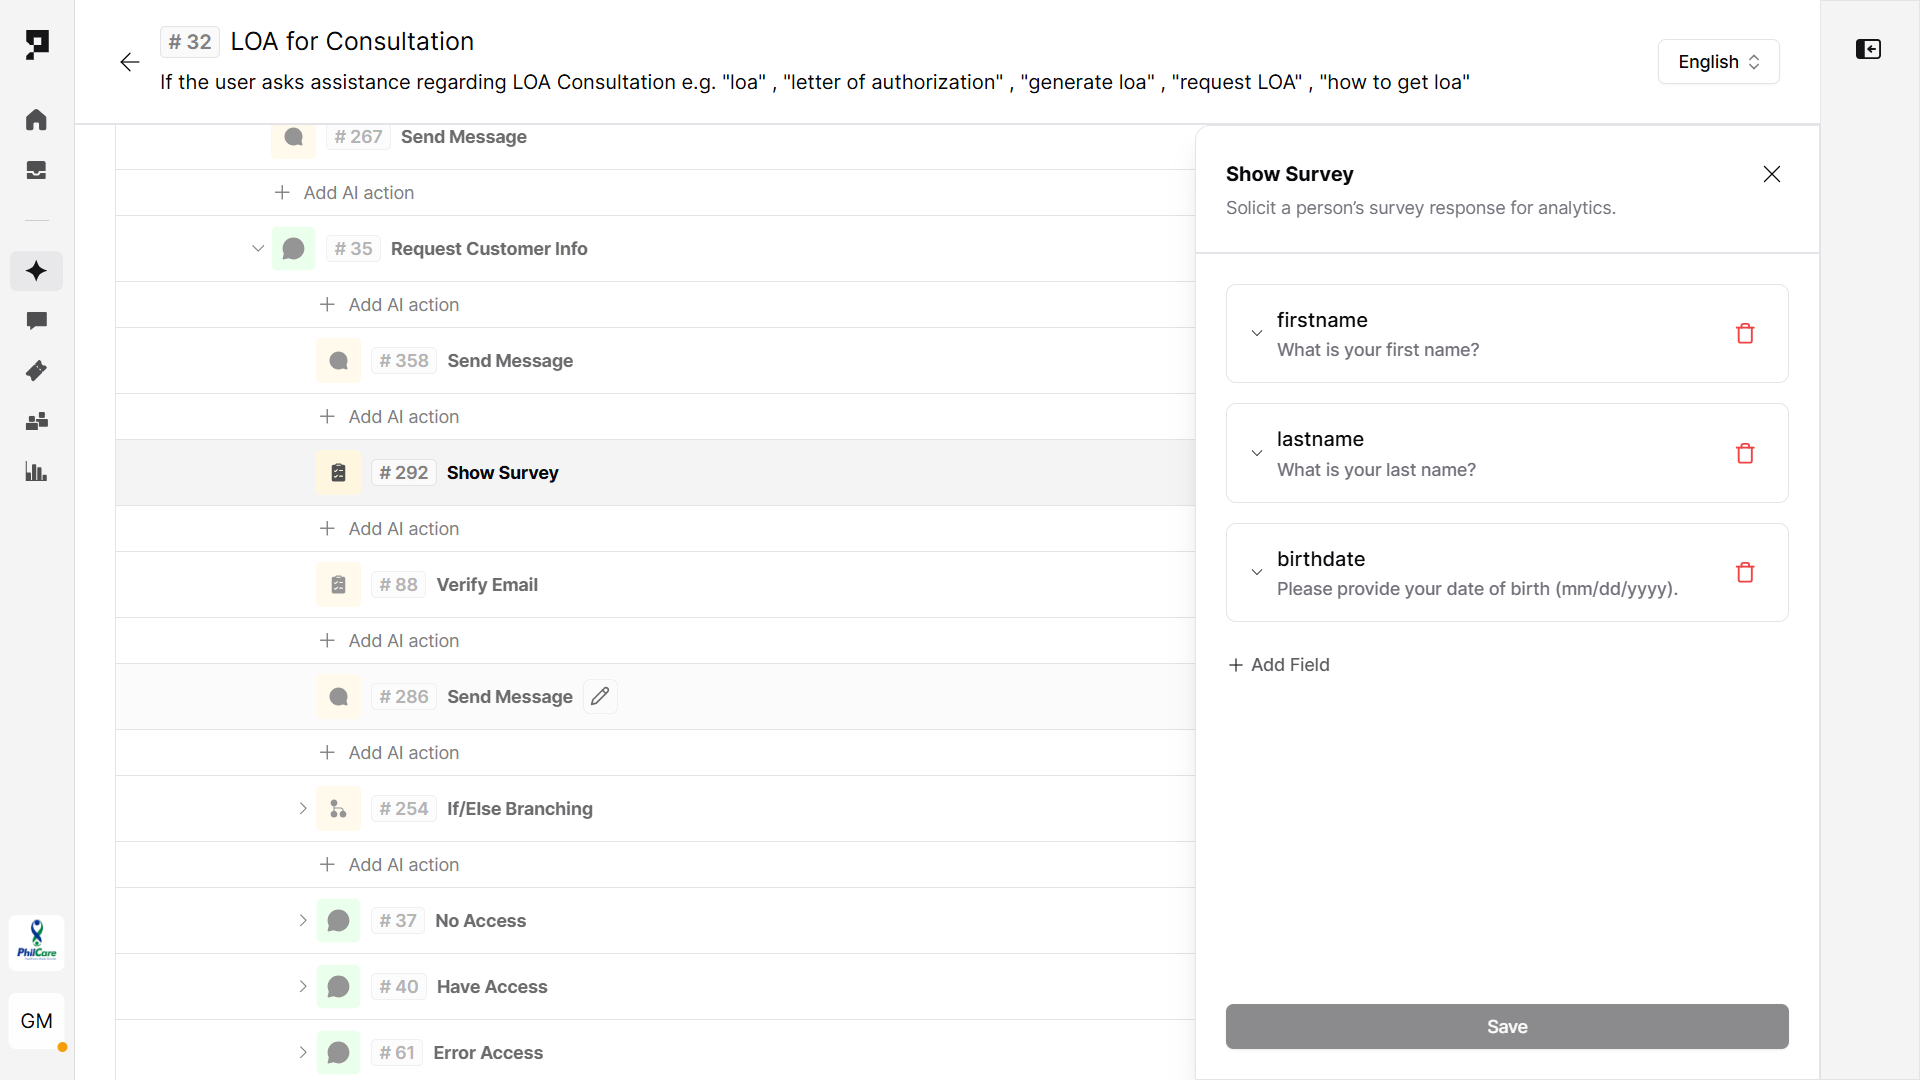
2. Collect user verification details via Survey
Purpose: Capture user details needed to process the LOA.
Use a Survey Action to collect the user information. Every values will be automatically stored in the related variable allowing further manipulations with the collected data:
- First name (
first_name) - Last name (
last_name) - Birthdate (
birthdate)
3. Collect doctor details via Survey
Purpose: Capture the consulting doctor’s name.
Use another Survey Action to collect the doctor details. Every values will be automatically stored in the related variable allowing further manipulations with the collected data:
- Doctor’s first name
dr_first_name - Doctor’s last name
dr_last_name

4. Validate eligibility with API
Purpose: Validate doctor details and check LOA eligibility.
- Use the Send API Request action. Method:
GET - Add URL endpoint, API key and define the variable to store the API response (e.g.
loa_result.reponse).
5. Confirm LOA approval
Purpose: Notify the user if the LOA was approved based on API response.
Use a If/Else branching Action to evaluate the API response variable:
- Condition:
loa_result.response.successFlag == true- Response: Inform the user that selected doctor's services are included in their coverage
- Else: Suggest a user to select another doctor

6. Test the Flow
You can test your new workflow without leaving the Action settings, using the Conversation tester side panel. Finalize the AI agent deployment by configuring your preferred channels and languages.

Health plan eligibility
1. Create a Trigger
Purpose: Create a new flow within AI Assistant Actions.
- Navigate to the Actions tab in the AI assistant's settings.
- Click “+ Add Trigger” button and select the Message Received trigger type.
- Name the trigger (e.g. “Status verification”) and provide a short description like "If the user asks about their plan and benefits e.g., "Can you check my account status?", ‘"I want to check my plan", "Please check my benefits"
- If your assistant is powered by an LLM, the Description acts like a prompt to help the AI decide when to activate the trigger.
Learn more about AI Triggers and Actions.
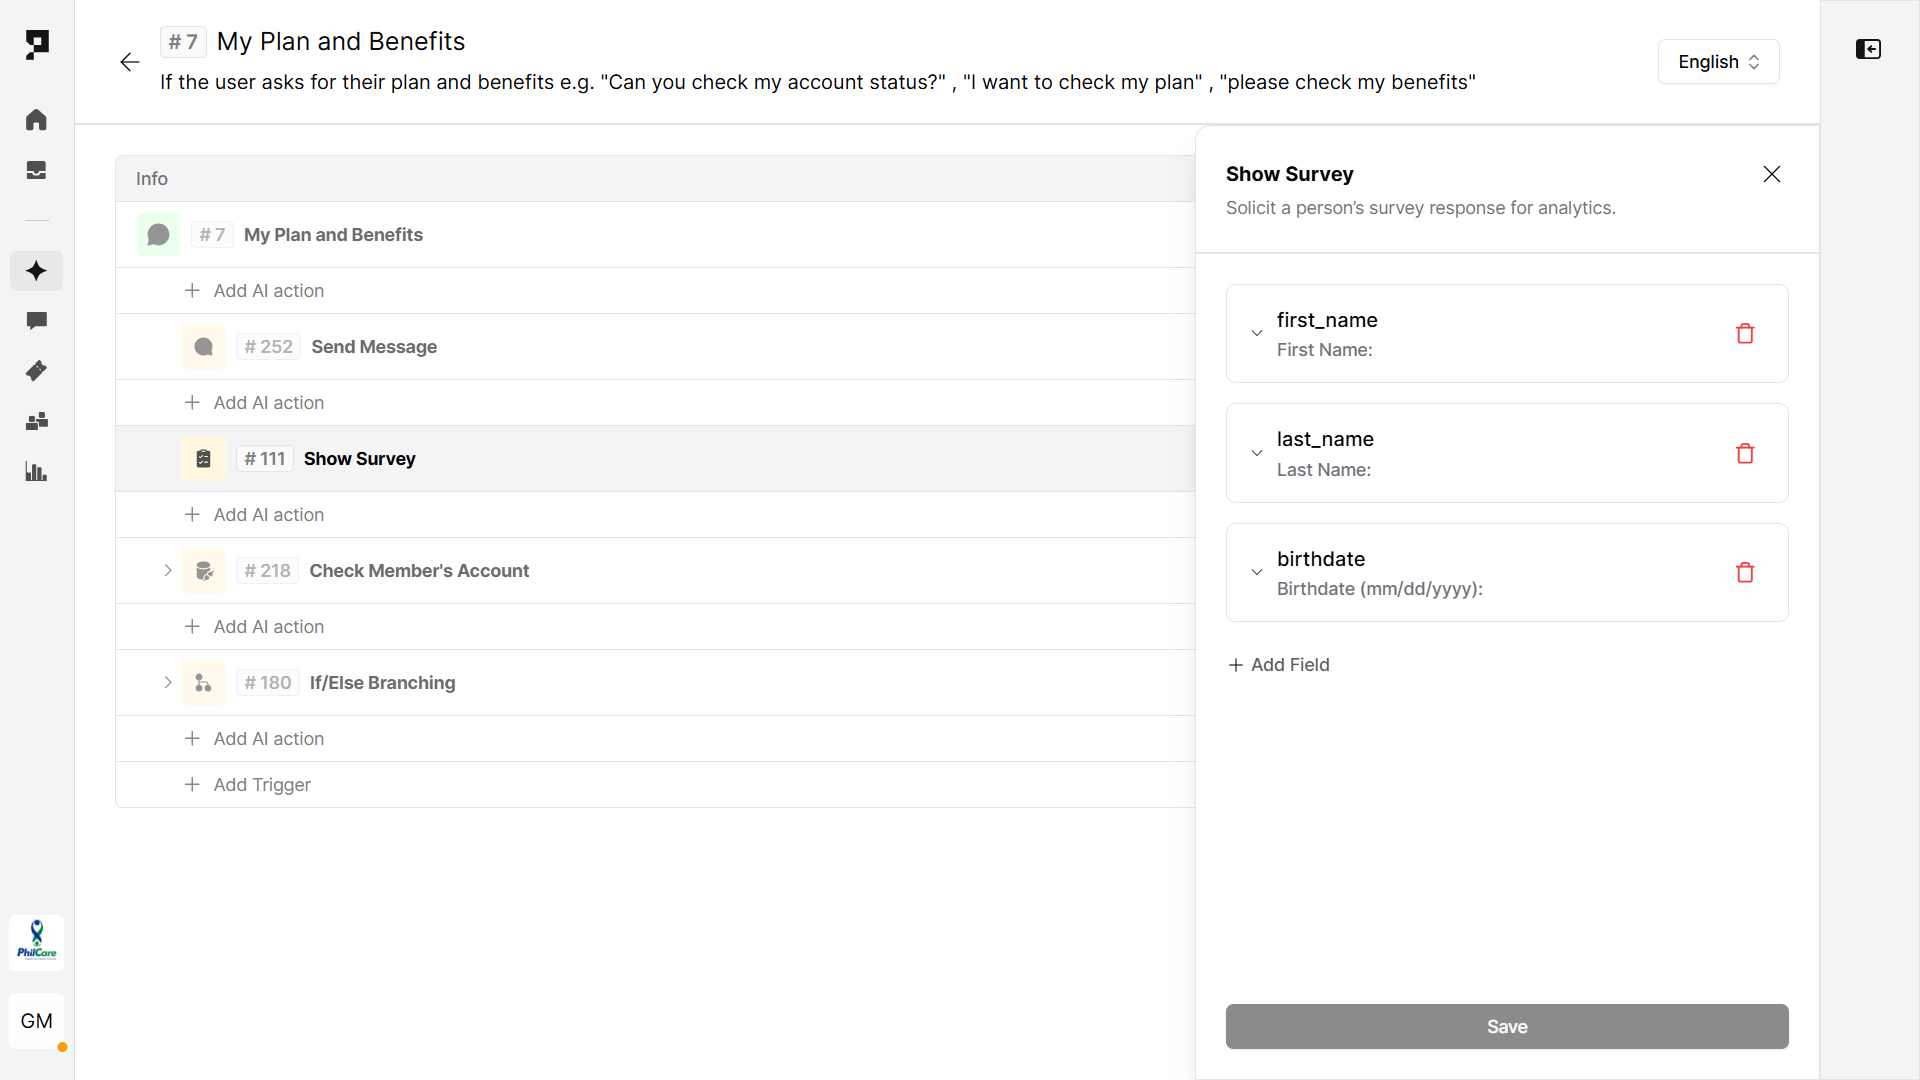
2. Collect member information
Purpose: Capture the patient's personal details to check the eligibility.
Use a Survey Action to collect the required information, including the appointment date. Every values will be automatically stored in the related variable allowing further manipulations with the collected data:
- First name (
first_name) - Last name (
last_name) - Date of birth (
birthdate)
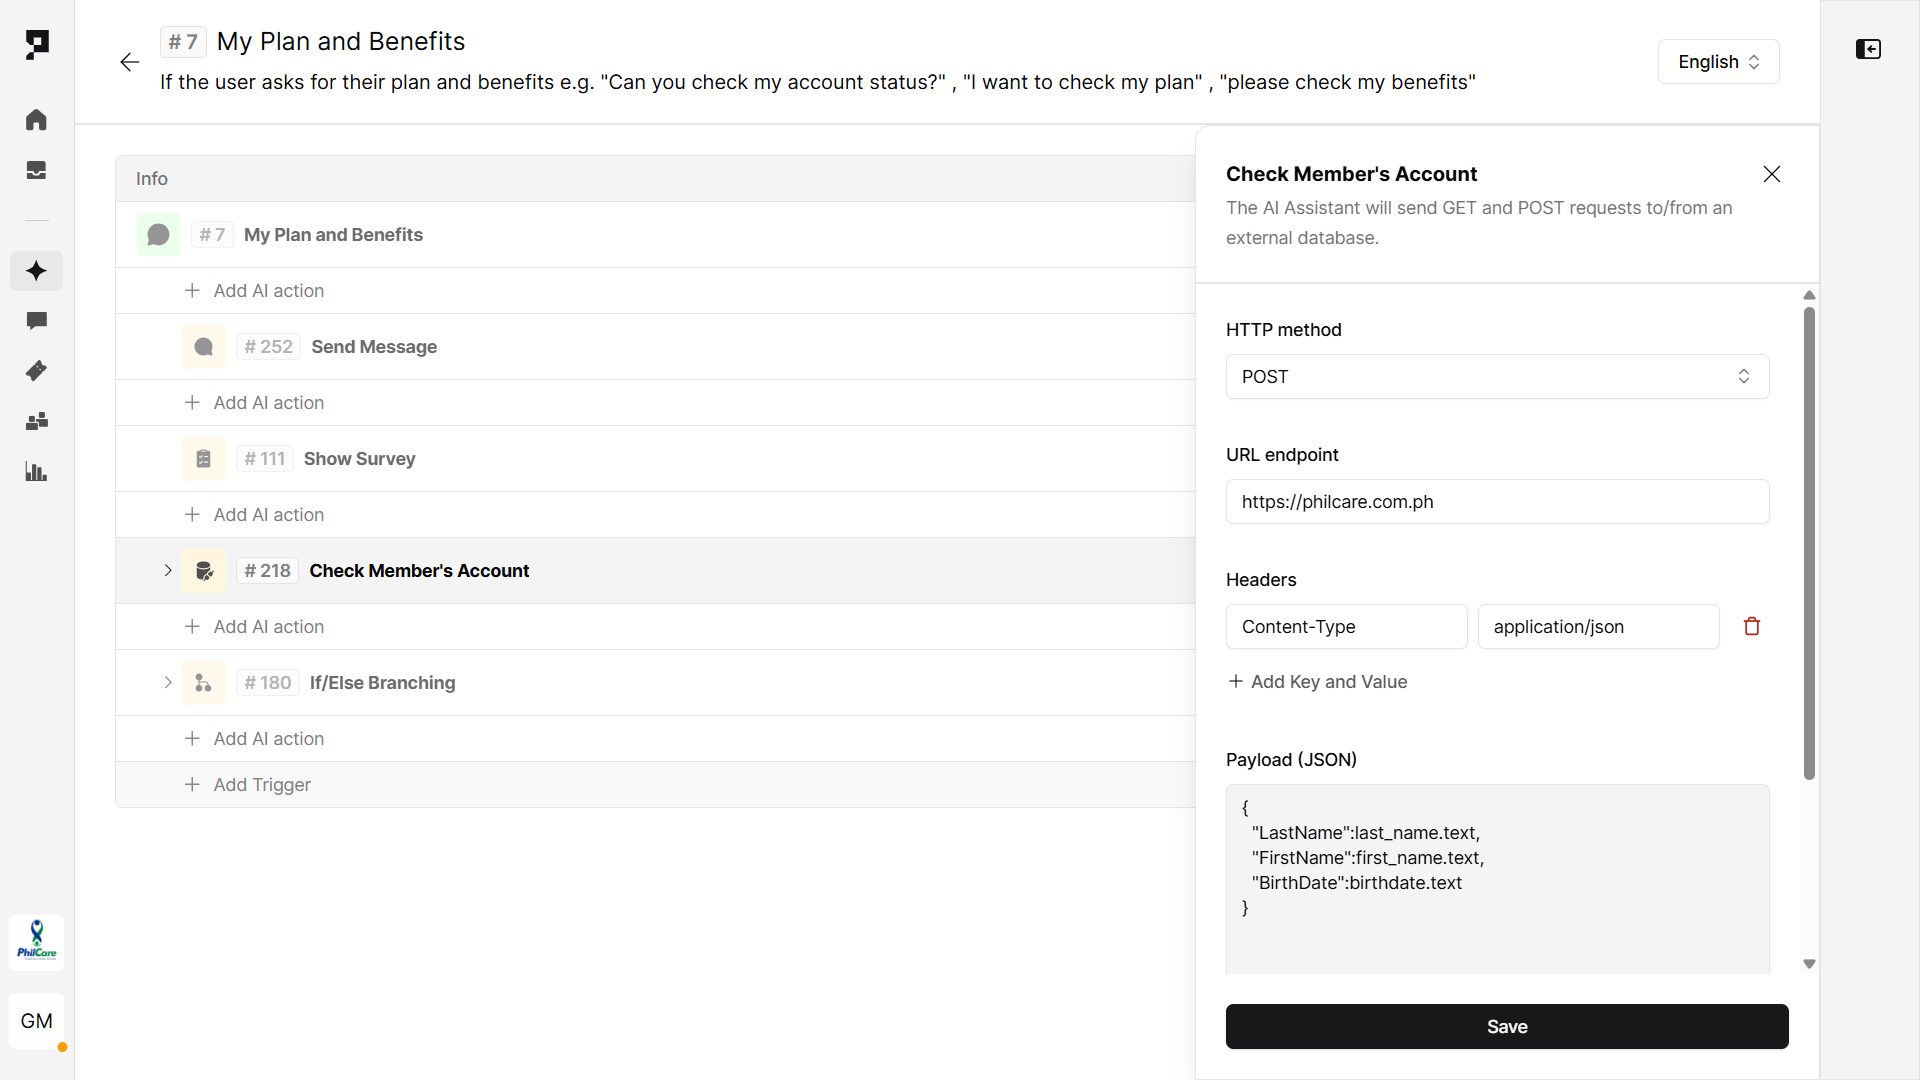
3. Call the patient verification API
Purpose: Validate patient details and confirm patient existance.
- Use the Send API Request action. Method:
POST - Add URL endpoint and API key.
4. Show coverage details
Purpose: Respond to the patient with coverage details based on the received API data.
Use an If/Else Branching action to evaluate the API response variable (result.SuccessFlag).
- Condition:
result.SuccessFlag == 1- Share plan's coverage details.
- Allow user to continue the conversation by Jumping to any other Action. Learn more about Jump action.
- Else: Inform the patient that there is no available coverage and handle other unexpected or undefined responses.

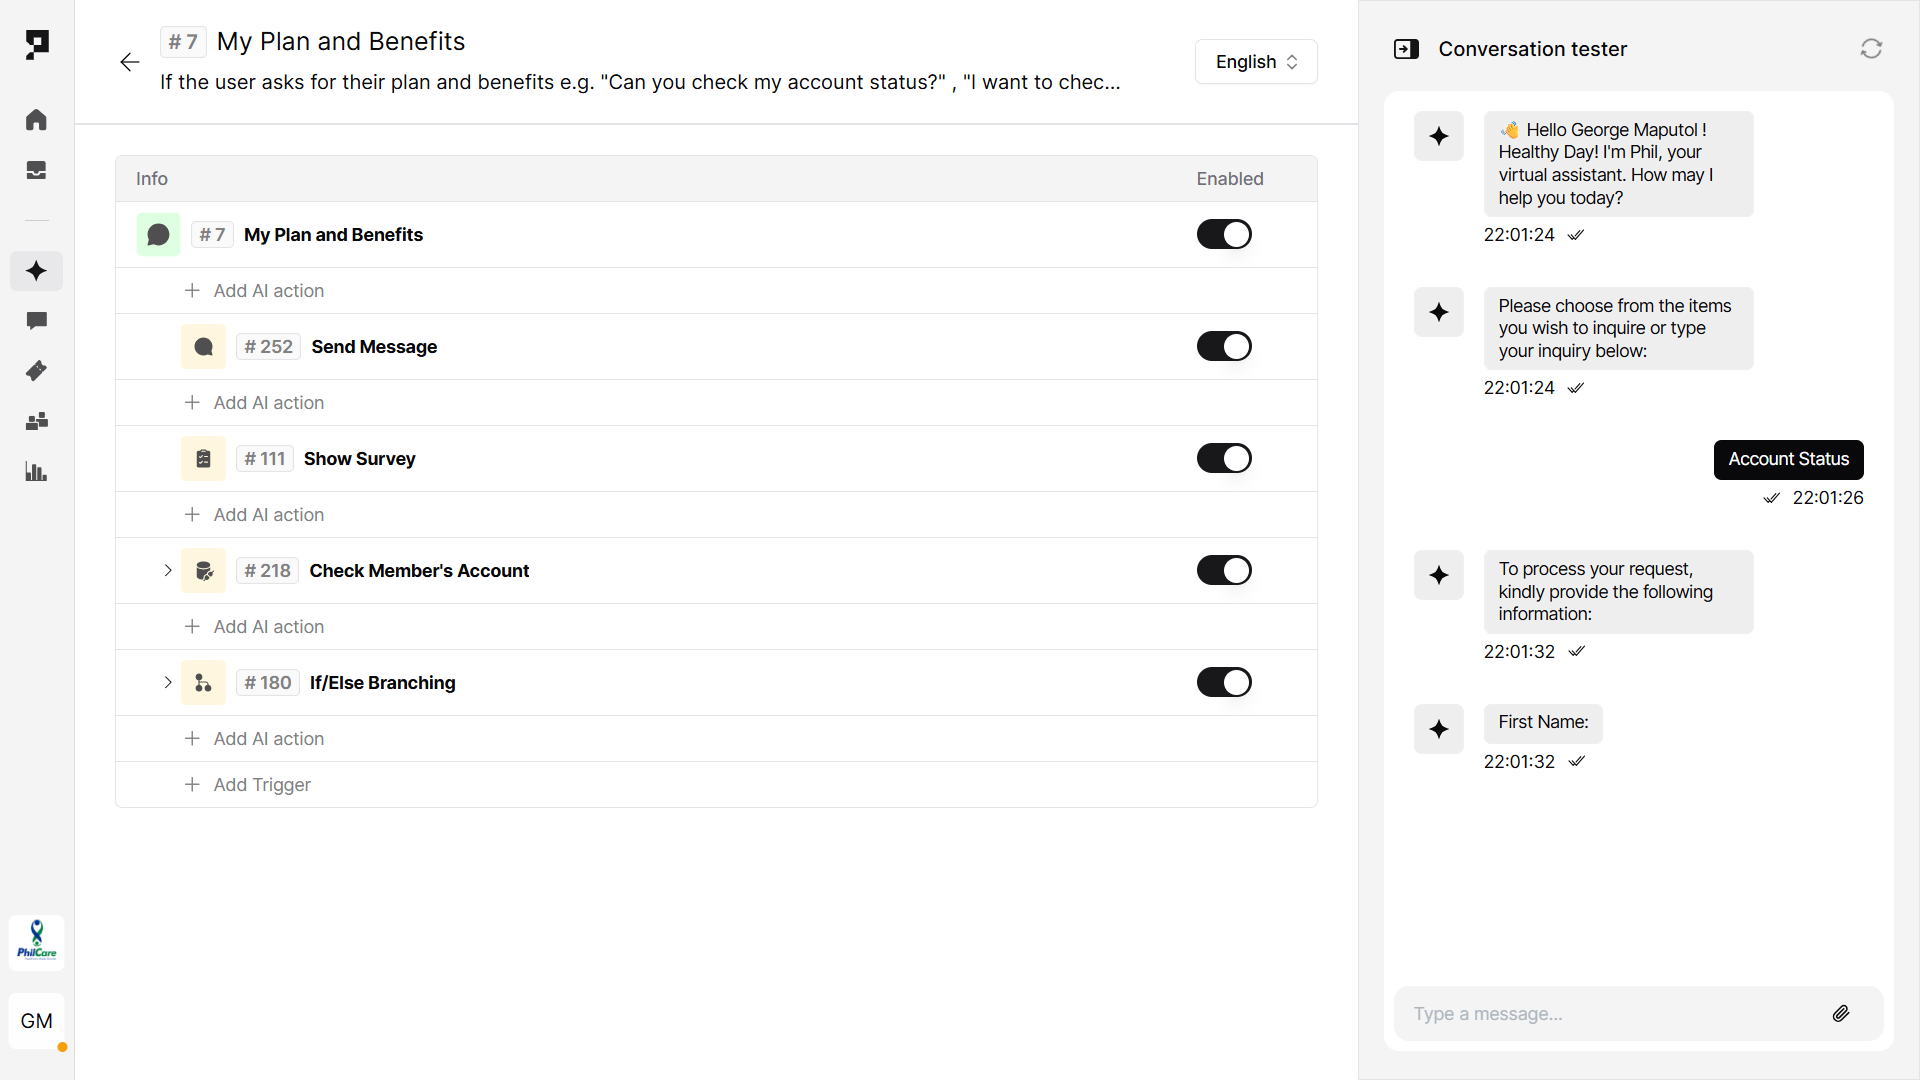
8. Test the flow
You can test your new workflow without leaving the Action settings, using the Conversation tester side panel. Validate the entire process:
- Ensure the workflow is correctly triggered by relevant user queries. Fine-tune the trigger using exclusion phrases to prevent false positives.
- Test each action step, including Survey submissions, API calls, and variable mappings. Reliable API handling is essential for accurate data retrieval and display.
- Once verified, finalize the Assistant deployment by configuring your preferred channels and languages.
Client stories
In the Philippines, PhilCare, The Medical City Clinic, and The Medical City South Luzon use Proto’s platform to automate high-volume healthcare transactions such as medical appointment bookings, LOA generation, and payment status inquiries.
- At PhilCare, the AI agent manages over 2.6 million interactions annually, automating nearly half of all inquiries related to scheduling, diagnostics, and LOAs — significantly reducing agent workload. Read more.
- The Medical City Clinic’s agent handles over 10,000 chats monthly, covering appointment requests, test results, and clinic hours, with 52% automation. Read more.
- The Medical City South Luzon enables appointment flows across chat channels like Messenger and Viber, automating 63% of conversations. Read more.
These deployments show how Proto enables 24/7, multilingual support for routine healthcare transactions, enhancing patient access while reducing service bottlenecks.